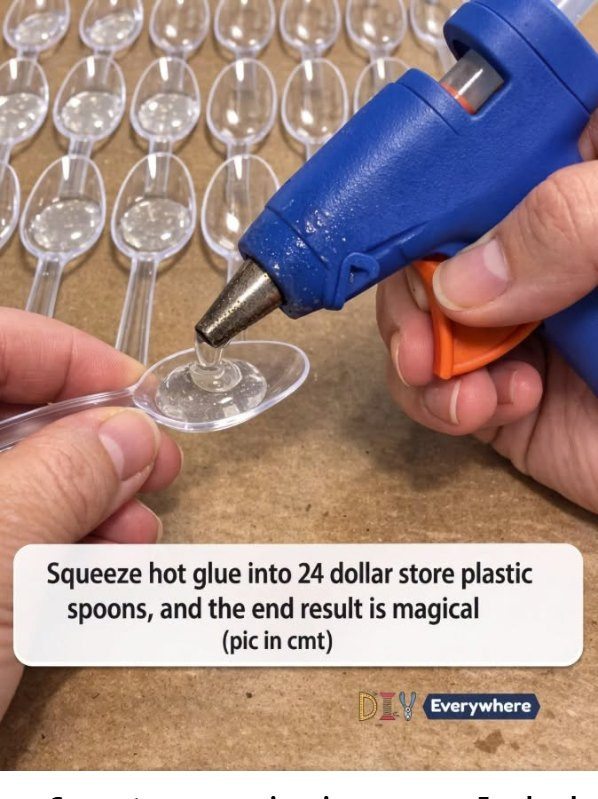
What if I told you that a handful of inexpensive plastic spoons could become one of the prettiest decorations on your Christmas tree? It sounds a little unusual, I know! But with sparkling red glitter, a few gold beads, and a little creativity, ordinary plastic spoons can be transformed into beautiful poinsettia-inspired ornaments that look surprisingly elegant.
This DIY red glitter poinsettia ornament is proof that holiday decorating doesn’t have to be expensive to look beautiful.
Imagine layered red petals catching the twinkle of Christmas lights, a shimmering gold&
nbsp;
center, and a delicate ribbon that lets your handmade flower hang proudly on the tree. You could also use these sparkling creations to decorate a wreath, dress up a wrapped present, or add a festive touch to a holiday centerpiece.
And the best part? You don’t need to be an experienced crafter to make something lovely!
If you enjoy finding clever ways to decorate on a budget, this project is a wonderful excuse to gather your supplies, put on some Christmas music, and spend a cozy afternoon making something
special.
Let’s turn those simple dollar-store spoons into a little holiday magic!
What Are DIY Plastic Spoon Poinsettia Ornaments?
Poinsettias are closely associated with Christmas because of their colorful, star-shaped bracts, which are often mistaken for flower petals. Their rich red and green appearance has made them a favorite in holiday decorating for generations.
This craft takes inspiration from that familiar shape and recreates it using the rounded bowls of clear plastic spoons.
The spoon bowls become individual petals. Once arranged in overlapping layers, they form a full flower shape.
Red
glitter adds sparkle, while gold beads clustered in the middle create a decorative center.
A ribbon loop completes the ornament, making it easy to hang wherever you want a little extra holiday cheer.
Although these handmade flowers aren’t real poinsettias, they capture the festive colors and layered appearance that make the traditional Christmas flower so recognizable.
You can keep yours classic with red and gold, or experiment with white, silver, emerald green, champagne, or even icy blue.
One simple idea, so many possibilities!
Why You’ll Love This Christmas
Craft
There
are plenty of reasons to give these DIY poinsettia ornaments a try.
They’re Budget-Friendly
Plastic spoons, glitter, beads, and ribbon are usually inexpensive supplies. If you already have a glue gun and some craft materials at home, you may only need to purchase a few extras.
You can create several decorations without investing in costly specialty ornaments.
They Look Beautiful on a Christmas Tree
The layered petals give the ornament depth, while the glitter reflects the light from nearby Christmas lights.
Red and gold make a particularly
festive combination, especially
when paired with traditional green branches, gold ribbon, and warm white lights.
They’re Easy to Customize
Prefer a snowy winter theme? Use white glitter and silver beads.
Love a traditional Christmas palette? Stick with red petals and a gold center.
Want something more modern? Try champagne glitter, pearl-colored beads, or deep emerald accents.
You can even make a collection in different colors for a coordinated handmade display.
They’re Great for Handmade Gifts
A finished poinsettia ornament makes a thoughtful little gift for friends, neighbors, teachers, coworkers,
or family members.
Attach
a ribbon and place it in a small gift box or reusable presentation bag. It’s a lovely way to share something handmade without spending a fortune.
They’re a Fun Group Activity
This project can be enjoyable for a holiday crafting afternoon with friends or family. Adults can prepare the spoon pieces and handle the hot glue, while older children can help with glitter and decoration under close supervision.
The result is a collection of ornaments that can become part of your family’s holiday decorating tradition.
Materials You’ll Need
This project
uses 24 clear plastic spoons to create one layered poinsettia-style ornament.
Gather these supplies before you begin:
24 clear plastic spoons: Lightweight spoons with rounded bowls are easiest to arrange.
Hot glue gun: A low-temperature model may be more suitable for delicate plastic, although you should test it first.
Hot glue sticks: Keep a few extra nearby.
Red glitter: Fine glitter gives the petals a sparkling finish.
Gold beads or decorative pearls: These form the flower’s center.
Suitable craft adhesive: Useful if your chosen
beads aren’t compatible with hot glue.
Small scissors or craft snips: For trimming the spoon handles.
Ribbon or hanging cord: For making the ornament easy to display.
Small piece of sturdy cardboard or a craft base: To support the flower’s center.
Tweezers: Optional, but helpful for positioning small beads.
Paper or a shallow tray: To catch excess glitter and make cleanup easier.
You may also want a small brush for removing loose glitter once the adhesive has dried.
A Quick Safety Note Before You BeginA Quick Safety Note Before You
Begin
Plastic spoons vary in material
and heat resistance. Hot glue can soften or deform some plastics, and overheated plastic may release irritating fumes.
Use the lowest practical glue-gun temperature, work in a well-ventilated area, and test your technique on one spoon before continuing. Keep your fingers away from hot glue and allow every piece to cool fully before handling it.
If the spoon softens, bends unexpectedly, or gives off an unusual odor, stop using that method. A suitable cool-setting craft adhesive may be a better option.
Hot glue
guns should be operated by an adult or under close adult supervision. Keep the heated nozzle away from skin, and never leave a plugged-in glue gun unattended.
How to Make Red Glitter Plastic Spoon Poinsettias
Ready to turn those ordinary spoons into something festive? Let’s get crafting!
Step 1: Prepare Your Work Area
Cover your table with scrap paper, a protective mat, or another suitable surface.
Place the red glitter in a shallow tray or on a folded sheet of paper. This will catch the excess glitter and make it
easier to return unused material to its
container.
Set out the spoons, beads, ribbon, adhesive, and craft base so everything is within reach.
If you’re using a hot glue gun, place it on a stable, heat-resistant stand and keep the cord away from the working area.
A little preparation makes the whole project much easier.
Step 2: Separate the Spoon Bowls From the Handles
You’ll use the rounded bowls of the spoons to create the flower petals.
Carefully cut or snip off the handles, leaving the spoon bowls as
intact as possible. Depending on the spoon design,
you may need to trim away a small section of the handle attachment.
Work slowly to avoid cracking the plastic.
Smooth any sharp or jagged edges with appropriate craft tools, and discard the offcuts safely.
Tip: Test one spoon before preparing all 24. If the plastic cracks or splits when cut, choose a different type of spoon or use a safer cutting method.
Step 3: Test the Adhesive on One Spoon
Before decorating all the pieces, test how your chosen adhesive
behaves with the plastic.
If you’re using hot glue,
apply a very small amount to an inconspicuous area of one spoon bowl and let it cool.
Check whether the plastic warps and whether the glue holds securely.
If the spoon deforms, don’t continue with the same method. Switch to a compatible craft adhesive that doesn’t require heat.
This small test can save you from having to remake the entire ornament!
Step 4: Add the Red Glitter
Place a spoon bowl on your protected work surface.
Apply a thin, even
layer of suitable craft adhesive to the surface you want
to decorate. Sprinkle red glitter over the adhesive, making sure the bowl is covered evenly.
Gently tap off the excess glitter into your collection tray.
Repeat with the remaining spoon bowls.
Allow the adhesive to dry completely according to its product instructions before assembling the flower.
For a cleaner finish, work over a tray and avoid using more adhesive than necessary. Thick, uneven layers can leave clumps or make the petals look less polished.
If you prefer a subtler
look, glitter only the front of each petal. For extra sparkle,
you can decorate both sides, provided the adhesive is suitable for the plastic.
Step 5: Arrange the Petals Into Layers
Now comes the fun part!
Arrange the 24 decorated spoon bowls into overlapping layers to create a poinsettia-inspired flower.
Start with a small central cluster and position additional petals around it, gradually building outward into a fuller shape.
Rotate the bowls slightly as you arrange them so they resemble the radiating bracts of a poinsettia rather than a
simple row of spoons.
Take a moment to experiment with the arrangement
before attaching anything permanently.
You want the petals to look balanced, with enough overlap to hide the connections without covering too much of the glittered surface.
There isn’t just one correct arrangement. The exact pattern will depend on the size and shape of your spoon bowls and the base you use.
Step 6: Secure the Petals
Once you’re happy with the layout, attach the petals to a small, sturdy craft base or to one another where appropriate.
If you’re using hot glue, apply only a small amount at a time
and keep the glue away from areas where it might distort the plastic.
Hold each piece in position until the adhesive has set, following the product’s instructions.
Continue working outward, checking the shape as you go.
If the flower becomes uneven, pause and adjust the next petals rather than trying to force everything into place at the end.
Important: The flower should be lightweight enough for the finished ornament to hang securely. Avoid relying on a
single tiny glue joint to support the entire decoration.
Step 7: Add the Gold
ornament look messy.
Small, controlled applications are usually easier to manage than large blobs.
Plan the Petal Arrangement First
Arrange the pieces before gluing them together.
This gives you a chance to experiment with the shape and decide where each layer should sit.
Let Each Layer Set
Rushing the assembly can cause petals to shift before the adhesive has secured them.
Give each connection enough time to set before adding more weight or moving the



0 comments:
Post a Comment