Top Ad 728x90

Showing posts with label Recipes & Food. Show all posts

Thursday, October 22, 2026

If Your Feet Swell, It May Be a Sign That…

If Your Feet Swell, It May Be a Sign That…

by
If Your Feet Swell, It May Be a Sign That…

If Your Feet Swell, It May Be a Sign That…

Swollen feet are common and can happen after spending a long time standing or sitting, during hot weather, after eating a salty meal, or for other reasons. In many cases, the swelling is temporary and improves with simple measures.

However, persistent or unexplained swelling can sometimes be associated with an underlying health problem. Paying attention to other symptoms can help determine when medical advice is appropriate.

Why Do Our Feet Swell?

Get Health Tips

Get Produce Boxes

Swelling in the feet, commonly called edema, occurs when excess fluid collects in the tissues. It can have many possible causes, including:

Heat, which can cause blood vessels to expand

Standing or sitting for long periods

A high-sodium diet

Pregnancy

Certain medications

Reduced physical activity

Some circulation problems

Certain kidney, heart, or liver conditions

Temporary swelling is often not serious. However, persistent, recurrent, or unexplained swelling should not automatically Find Treatments

be dismissed, particularly if it is accompanied by other symptoms.

Natural and Simple Ways to Reduce Swelling

Cold Therapy

for Temporary Relief A cold compress wrapped in a cloth can sometimes provide temporary relief from discomfort associated with swelling. Apply it to the affected area for about 15–20 minutes, avoiding direct contact between ice and the skin.Study Anatomy

Discover more Find Recipes Compare Broadband Seek Counseling

This may be particularly soothing after a hot day or prolonged standing. Stop if the skin becomes painful, excessively numb, or discolored.

Elevate Your Legs Lie down and raise your legs above heart level by resting them against a wall or on

cushions. Elevating the legs can encourage excess fluid to move away from the lower limbs and may temporarily reduce swelling.

Avoid remaining in one position for long periods. Gentle movement, when appropriate, can also help maintain normal circulation.Find Treatments

Simple measures may ease temporary swelling, but the cause matters—especially whenthe swelling is persistent, affects only one leg, or appears with other symptoms.

When Swollen Feet Deserve Medical Attention

Contact a healthcare professional if swelling persists, keeps returning, becomes significantly worse, or has no obvious explanation. An evaluation may be

especially important if you have an existing heart, kidney, liver, or circulation condition.

Sudden swelling in one leg, particularly when accompanied by pain, warmth, redness, or tenderness, requires prompt medical assessment because it can sometimes be associated with a blood clot.

Seek emergency medical attention if swelling occurs with sudden shortness of breath, chest pain, fainting, or difficulty breathing.

Final Thoughts

Swollen feet can result from everyday factors such as heat, prolonged standing, inactivity, or a salty meal, and temporary swelling may improve with elevation, movement, and other comfort measures.

Nevertheless, swelling is a symptom rather than a diagnosis. If it is persistent, severe, sudden, or accompanied by other concerningsymptoms, professional medical evaluation is important to identify the underlying cause.


Natural remedy to relieve bone pain and improve mental health

Natural remedy to relieve bone pain and improve mental health

by
Natural remedy to relieve bone pain and improve mental health

You’re not lazy. You’re not “just getting older.”

You might simply be missing a key piece of daily nourishment—one that nature has provided for centuries, but modern life has forgotten.

Enter a revived ancestral remedy now making waves in natural wellness circles: a simple, golden-hued morning drink made from five pantry staples—honey, cinnamon, turmeric, apple cider vinegar, and chia seeds.

Individually, each ingredient is powerful.

Together? They create a synergistic “golden elixir” that:

✅ Reduces inflammation linked to joint and bone pain

✅ Supports balanced mood and

mental clarity

Stabilizes energy without caffeine crashes

Nourishes your gut—the root of immunity and mood

And the best part? It takes under 2 minutes to make, costs pennies a day, and feels like a warm hug in a cup.

Let’s dive into why this remedy works, how to make it perfectly, and the science behind each healing ingredient.

Why This Combination Works: Synergy Over Supplements

Modern medicine often isolates compounds—but nature heals through whole-food synergy.

This blend works because:

Turmeric + black pepper + healthy fat (from chia) = enhanced curcumin

absorption (up to 2,000% more effective!)

Apple cider vinegar + honey = gentle alkalizing effect that may reduce acidic inflammation

Cinnamon + chia = blood sugar stabilization = fewer energy crashes and mood swings

All ingredients support gut health = 90% of serotonin (your “feel-good” hormone) is made in the gut!

This isn’t a quick fix—it’s daily nourishment that builds resilience over time.

The Golden Morning Elixir Recipe (Serves 1)

Ingredients:

1 cup warm (not boiling) water or herbal tea

1 tsp raw, unfiltered honey (preferably local or Manuka)

½ tsp ground turmeric (

or fresh grated)

¼ tsp Ceylon cinnamon (“true” cinnamon, lower in coumarin)

1 tsp apple cider vinegar (with “the mother”)

1 tsp chia seeds (soaked for 5 minutes if preferred)

Optional but recommended: A pinch of freshly ground black pepper (boosts turmeric absorption)

Optional: Squeeze of lemon for extra detox support

Instructions:

In a mug, combine warm water and chia seeds. Let sit 1–2 minutes (they’ll start to gel).

Add honey, turmeric, cinnamon, apple cider vinegar, and black pepper.

Stir vigorously until smooth.

Sip slowly on an

empty stomach,

20–30 minutes before breakfast.Best time: First thing in the morning—before coffee, email, or social media.

The Healing Power of Each Ingredient

Turmeric – The Anti-Inflammatory Hero

Contains curcumin, shown in studies to reduce joint pain and stiffness as effectively as some NSAIDs—without gut damage. Also crosses the blood-brain barrier to support brain health and reduce symptoms of depression. 2. Raw Honey – Nature’s Soothing Sweetener

Packed with antioxidants and enzymes that reduce oxidative stress (linked to chronic pain and anxiety). Unlike sugar, raw honey has

a low glycemic

impact and supports beneficial gut bacteria. 3. Ceylon Cinnamon – The Metabolic Balancer Improves insulin sensitivity = fewer blood sugar spikes = stable mood and energy. Also shows promise in reducing arthritis-related inflammation.

Apple Cider Vinegar (ACV) – The Gentle Detoxifier Rich in acetic acid, which may improve mineral absorption (like calcium and magnesium—key for bone health). Supports digestion and gut microbiome balance, directly influencing mental well-being.

Chia Seeds – The Omega-3 Powerhouse One of the best plant-based sources of omega-3 fatty acids, known to reduce joint inflammation and

support brain function.

High in

fiber and magnesium—relaxes muscles and calms the nervous system.

What to Expect: Realistic Benefits Over Time

Timeframe What You May Notice

Days 1–3 Slightly better digestion, subtle mood lift

Days 4–7 Reduced morning stiffness, smoother energy (no 10 a.m. crash)

Weeks 2–4 Noticeable decrease in joint discomfort, improved sleep quality, clearer thinking

1+ Month Cumulative anti-inflammatory and mood-stabilizing

effects—especially when combined with healthy habits

Consistency is key: This is a tonic, not a drug. Daily use builds lasting benefits.

Important Tips & Safety Notes

Always use

warm—not hot—water: Boiling water destroys honey’s enzymes and ACV’s beneficial bacteria.

Choose quality ingredients: Raw honey, organic turmeric, and ACV with “the mother” make a real difference.

If on blood thinners: Consult your doctor before using turmeric or cinnamon in medicinal amounts.

Pregnant or diabetic? Talk to your healthcare provider—but for most, this blend is safe in moderation.

Final Thought:

Your Morning Ritual, Reimagined

In a world of quick fixes and synthetic stimulants, this golden elixir invites you back to something deeper: the slow, steady wisdom of whole foods.

It won’t “cure” chronic illness overnight—but it will send a daily signal to your body:

“You are safe. You are nourished. You are supported.”

And over time? That message can transform not just your pain—but your peace.

Try it for 7 days. Your joints—and your mind—might just thank you.

Loved this natural remedy?

Save this recipe for your morning

ritual

Share it with someone battling fatigue or joint pain

Comment below: Which ingredient surprised you the most?

Disclaimer: This article is for educational purposes only and is

not a substitute for medical advice. Always consult your healthcare provider before starting any new wellness regimen, especially if you have underlying health conditions, are pregnant, or take medications.

Say Goodbye to Yellow Teeth, Tartar, and Bad Breath With Only 2 Simple Ingredients

Say Goodbye to Yellow Teeth, Tartar, and Bad Breath With Only 2 Simple Ingredients

by
Say Goodbye to Yellow Teeth, Tartar, and Bad Breath With Only 2 Simple Ingredients

Say Goodbye to Yellow Teeth, Tartar, and Bad Breath With Only 2 Simple Ingredients

Yellow teeth, stubborn tartar, and bad breath are some of the most common oral health complaints today. Coffee, tea, smoking, sugary foods, and even poor brushing habits can slowly stain your teeth and allow plaque to harden into tartar. While professional whitening treatments and dental cleanings work, many people look for natural, low-cost alternatives they can use at home.

The good news? A simple 2-ingredient remedy has gained attention for helping improve tooth appearance and

freshen breath—without harsh chemicals.

Why Teeth Turn Yellow and Tartar Builds Up

Before fixing the problem, it helps to understand it:

Plaque buildup forms when bacteria mix with food particles

If not removed, plaque hardens into tartar (calculus)

Tartar traps stains from coffee, tea, wine, and tobacco

Bacteria release sulfur compounds that cause bad breath

Once tartar forms, brushing alone isn’t enough. However, gentle natural abrasives and antibacterial ingredients can help reduce buildup over time and improve oral hygiene.

The 2 Simple Ingredients

This remedy uses ingredients many people

already have at home:

  1. Baking Soda

Mild abrasive that helps remove surface stains

Neutralizes acids in the mouth

Creates an environment less friendly to bacteria

  1. Coconut Oil

Naturally antibacterial

Helps reduce odor-causing bacteria

Soothes gums and supports oral balance

Together, they form a paste that gently cleans teeth while supporting fresher breath.

How to Make the Natural Teeth-Cleaning Paste

Ingredients:

1 teaspoon baking soda

1 teaspoon coconut oil (soft, not solid)

Instructions:

Mix both ingredients until a smooth paste form

Apply a small amount to your toothbrush

Brush

gently for 2 minutes

Spit out and rinse thoroughly with water

Use 2–3 times per week, not daily.

What Results Can You Expect?

With consistent but moderate

use, many people report:

Brighter-looking teeth (surface stains reduced)

Fresher breath

Less plaque buildup over time

Cleaner feeling along the gum line

This method does not replace professional dental cleanings, especially for hardened tartar below the gum line.

Important Safety Tips

Do not overuse baking soda (too abrasive if used daily)

Brush gently to protect enamel

Avoid if you have sensitive

teeth unless approved by a dentist

Always rinse well after use

For best results, combine this remedy with:

small Dailly habit

Daily flossing

Drinking plenty of water

Limiting sugary drinks and smoking

Natural Support, Not a Miracle Cure

This 2-ingredient method works best as supportive oral care, not an instant fix. Think of it as a way to improve cleanliness, freshness, and appearance between regular dental visits.

Healthy teeth are not just about looks—they support digestion, confidence, and overall health.

Final Thoughts

You don’t always

need expensive products to

improve your smile. With just baking soda and coconut oil, you can take a simple, natural step toward reducing yellow stains, managing tartar buildup, and fighting bad breath—right at home.

Consistency, gentleness, and good habits make all the difference.

How to Clean Dirty Pots and Pans Naturally  Check the first comment.

How to Clean Dirty Pots and Pans Naturally Check the first comment.

by
How to Clean Dirty Pots and Pans Naturally  Check the first comment.

Burnt pots and pans happen to everyone, especially on the underside. The good news is that you don’t need harsh chemicals to clean them. Simple kitchen ingredients like baking soda, salt, and citric acid can make them look almost new again.

Baking Soda – The Classic Solution

Baking soda is mildly abrasive and safe for most cookware.

How to use:

Mix baking soda with a little water to form a thick paste.

Apply it to the burnt areas.

Let it sit for 30–60 minutes (

overnight for heavy buildup).

Scrub with a sponge or brush and rinse well.

✔ Best for stainless steel and everyday cleaning.

Salt – For Light Burn Marks

Salt helps loosen residue without scratching.

How to use:

Sprinkle coarse salt on a damp pot bottom.

Scrub gently with a sponge or cloth.

Rinse thoroughly.

✔ Good for regular

maintenance.Baking Soda + Vinegar – For Stubborn Grease

This combo is very effective on old, greasy buildup.

How to use:

Pour white vinegar onto the burnt&

nbsp;

area.

Sprinkle baking soda over it.

Let it fizz and work for 10–15 minutes.

Scrub and rinse.

✔ Great for tough stains and grease.

Citric Acid (Lemon Salt) – The Most Powerful Option

Citric acid is especially effective for burnt-on residue and mineral buildup.

Method 1: Boiling

Fill the pot with water to cover the dirty area.

Add 1–2 tablespoons of citric acid.

Boil for 10–15 minutes.

Let it cool slightly, then scrub and rinse.

Method 2: Paste

Mix citric acid with a little

water.

Apply to the burnt surface.

Let sit for 20–30 minutes.

Scrub and rinse.

✔ Excellent for stainless steel and heavily burnt pots.

Precautions:

Do not use citric acidon plain aluminum cookware — it can discolor it.

Avoid metal scrubbers on non-stick surfaces.

Never mix citric acid with bleach or chlorine-based cleaners (dangerous).

Test any method on a small area first.

Wear gloves if you have sensitive skin.

With these natural methods, even the dirtiest pots can be cleaned safely and effectively — no harsh chemicals needed.

The Miracle Drink That Flushes Out 15kg of Toxins from Your Gut and Blood Vessels – Time-Tested Formula

The Miracle Drink That Flushes Out 15kg of Toxins from Your Gut and Blood Vessels – Time-Tested Formula

by
The Miracle Drink That Flushes Out 15kg of Toxins from Your Gut and Blood Vessels – Time-Tested Formula

Ingredients:

1 peeled lemon

1 tablespoon baking soda

1 thumb-sized piece of fresh ginger

1 garlic bulb

1 onion

1 liter filtered water

2 tablespoons turmeric powder

1 tablespoon raw honey

Instructions:

In a pot, add water, ginger, garlic, onion, and baking soda.

Bring to a boil. Once boiling, stir in turmeric.

Simmer for 10 minutes.

Remove from heat, cool slightly.

Add lemon juice and honey. Stir well.

How to Use:

Drink 2 tablespoons each morning on an empty stomach.

By Day 3, many report feeling lighter, more energetic,

and

less bloated.

After finishing the batch, take a break for a few days and repeat as needed.

Evening Cleanse Tonic: Detox While You Sleep

While you rest, this gentle tonic works to improve digestion, support elimination, and flush toxins that accumulate throughout the day.

1 tablespoon baking soda

Juice and peel of 1 lemon

½ head of cabbage (chopped)

A small bunch of fresh dill

A pinch of cinnamon

3–4 whole cloves

1 liter water

1 tablespoon raw honey

Instructions:

Add cabbage, dill, cinnamon, and cloves to

a pot with

water.

Stir in lemon juice and lemon peel.

Add baking soda and bring to a boil.

Let simmer for 30 minutes.

Cool, strain, and mix in honey.

How to Use:

Drink 1 cup after dinner, nightly.

Supports overnight cleansing and improved bowel movements.

Deep Dive: Why It Works

Lemon – Flushes toxins, alkalizes the body, and boosts immunity.

Garlic & Onion – Natural antibacterials and liver protectors.

Ginger – Calms the gut, reduces inflammation, eases digestion.

Baking Soda – Balances pH and soothes the digestive tract.

Turmeric – Anti-inflammatory superstar with

liver detox powers.

Cabbage –

Rich in fiber and prebiotics for gut health.

Dill, Cinnamon & Cloves – Antioxidant-rich, antimicrobial, and digestive aids.

Raw Honey – Natural enzyme booster and sweetener with healing properties.

What to Expect When You Detox

Reduced bloating and water retention

More regular, complete bowel movements

Increased energy and mental clarity

Clearer skin and fewer breakouts

Improved digestion and gut health

Balanced internal pH and less inflammation

Your body wants to detox. These ingredients simply give it the tools to do the job naturally.

Important Reminder

While these ingredients are natural and safe

for most, always consult your healthcare provider before starting any detox regimen — especially if you are pregnant, nursing, taking medications, or managing chronic illness.

Final Thoughts

This isn’t a crash diet or magic pill. It’s a return to ancient wisdom — rooted in the healing power of food and herbs. In just one week, this detox drink could transform how you feel from the inside out.

No more guessing. No more chemicals. Just a clean slate — and a clear path to vibrant health.

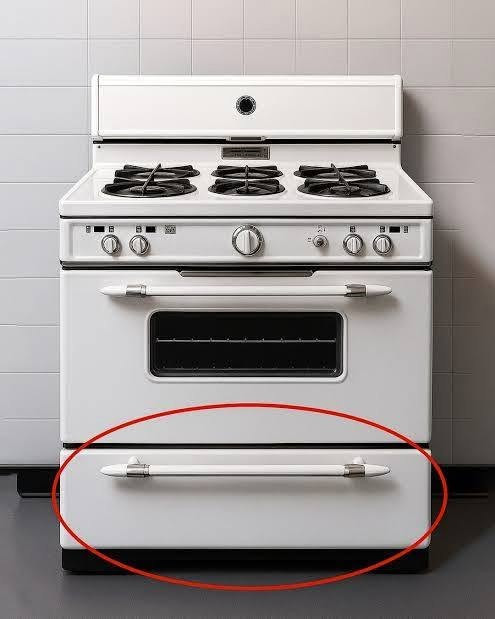
What Is the Little Drawer Under Your Oven Really For?

What Is the Little Drawer Under Your Oven Really For?

by
What Is the Little Drawer Under Your Oven Really For?

Have you ever opened the drawer beneath your oven to grab a baking tray and wondered whether it has another purpose?

Many homeowners use this space to store pans, cookie sheets, and other kitchen essentials. But depending on the oven, that familiar drawer may have been designed for something completely different.

Some ovens have storage drawers. Others feature warming drawers, while certain models include a broiler compartment.

The tricky part is that they can look surprisingly similar from the outside.

Before you start using yours for something new, here is

what you should know.

It Might Be a Simple Storage Drawer

On many conventional ovens, the bottom drawer is designed to hold cookware.

It can be a convenient place to keep baking sheets, roasting pans, and oven-safe accessories close at hand.

However, even a storage drawer has limitations.

The space beneath an oven may become warm during use, depending on the appliance’s design. Items stored there should be permitted by the manufacturer’s instructions.

Avoid keeping plastic containers, paper products, food packaging, or anything that could melt or catch fire in

the drawer.

The important detail: A drawer that looks like a storage compartment is not automatically safe for every kitchen item.

Some Oven Drawers Are Designed to Keep Food Warm

Certain ovens have a warming drawer rather than a basic storage compartment.

These drawers are designed to maintain food at a warm temperature until it is ready to serve.

They can be useful when preparing a large family meal, especially when several dishes finish cooking at different times.

For example, a warming drawer may help keep dinner rolls warm while

the main course finishes in the oven.

Some models offer temperature controls or specific settings for different types of food.

If your drawer has controls or your oven’s manual identifies it as a warming drawer, follow the manufacturer’s instructions for its use.

Do not assume a regular storage drawer can safely perform the same job.

Could It Be a Broiler Compartment?

On some older or particular oven designs, the compartment beneath the main oven is a broiler.

A broiler cooks food using intense direct heat, usually from above within the

compartment.

It can be used to brown the tops of certain dishes or cook suitable foods quickly.

Broiler compartments can resemble storage drawers, which is why checking the appliance model is important.

If yours is a broiler, never treat it as an ordinary place to store pans while the appliance is operating.

The compartment may become extremely hot, and anything stored inside could create a safety hazard.

How Can You Tell Which Type You Have?

You do not need to guess based on appearance alone.

Try these simple checks:

Look

for controls. Separate temperature settings may indicate a warming drawer or another specialized feature.

Check the oven’s model number. It is often printed on a label around the door frame, drawer opening, or appliance body.

Read the owner’s manual. It should explain the drawer’s intended purpose and any storage restrictions.

Check the manufacturer’s website. Search for the exact model number if you no longer have the manual.

Avoid reaching into the compartment or testing it with your hand while the oven is hot.

Never turn on a suspected broiler simply

to discover what it does.

Common Mistakes to Avoid

Even if your oven has a genuine storage drawer, a few habits can create problems.

Storing plastic items: Heat may cause certain plastics to soften, deform, or release unwanted fumes.

Keeping paper packaging inside: Paper towels, cardboard, and similar materials can pose a fire risk if exposed to sufficient heat.

Overloading the drawer: Heavy cookware can damage drawer slides or make the compartment difficult to open safely.

Blocking ventilation: Some appliances require specific clearances around their components. Follow the manufacturer’s guidance

rather than modifying the space.

Assuming every oven is identical: Similar-looking appliances can have very different drawer functions.

A quick manual check can prevent damage and help you use your appliance correctly.

The Small Kitchen Detail Worth Checking Today

The drawer beneath your oven is easy to overlook because it rarely attracts attention.

Yet knowing its intended function can help you organize your kitchen more effectively and avoid storing items in an unsuitable place.

If it is designed for storage, use it according to the manufacturer’s instructions. If it is

a warming drawer or broiler, learn its specific controls and safety requirements before using it.

That little compartment may be more useful than you realized, but its actual purpose depends on the oven you own.

The takeaway: Do not rely on appearance alone. Your oven’s model number and owner’s manual are the most reliable ways to identify the drawer correctly.

I am 73 years old, I live alone and I feel fulfilled: 4 tips that work for me.

I am 73 years old, I live alone and I feel fulfilled: 4 tips that work for me.

by
I am 73 years old, I live alone and I feel fulfilled: 4 tips that work for me.

I am 73 years old, I live alone and I feel fulfilled: 4 tips that work for me.

I’m 73, Live Alone, and Feel Fulfilled: 4 Tips That Work for Me

Eight years ago, my home grew quiet. My husband was gone. My children had built lives of their own. I braced for loneliness to settle on my chest like a stone. But instead of despair, something unexpected unfolded: a life of quiet richness, gentle rhythm, and deep self‑respect.

Living alone was never my plan. But it became my practice—a

daily choice to tend to my space, my spirit, and my connections. I’ve learned a humble truth: solitude is not isolation. The difference lies not in circumstances, but in small, intentional acts.

What follows isn’t advice—it’s companionship.Things I’ve Learned to Release

Letting disorder take root

A cluttered counter or unwashed dish may seem trivial. But neglect in our space quietly mirrors neglect within. Your home is your sanctuary—the one place you steward with care. Tending it is an act of self‑honor.

Staying indoors too long

At first,solitude feels

like freedom. Then days blur. Voices fade. Stepping outside—even just to buy bread or sit on a bench—is not indulgence. It’s how we stay woven into the world.

Why I Regret Moving Into a Nursing Home: 6 Hard Truths You Should Know!

90 percent get this wrong  Check the first comment.

90 percent get this wrong Check the first comment.

by
90 percent get this wrong  Check the first comment.

Do You Really Need to Remove the Dark Line From Shrimp? Here’s Why It Matters

If you’ve ever prepared shrimp at home, you’ve probably noticed the dark line running along the back.

Some people remove it immediately. Others cook shrimp without giving it a second thought.

But what exactly is that dark line—and should you remove it?

What Is the “Vein”?

Despite commonly being called a vein, the dark line along the back of a shrimp is&

nbsp;

actually its digestive tract.

It can contain digested food as well as tiny amounts of sand or grit.

That doesn’t necessarily mean the shrimp is unsafe to eat if the line is left intact, but it can sometimes affect the eating experience.

Why Do People Remove It?

One of the biggest reasons is texture and taste.

Depending on the shrimp and what it has consumed, the digestive tract can sometimes contain gritty material or contribute an unpleasant, muddy or bitter taste.Removing it gives

the

shrimp a cleaner appearance and can make the final dish more enjoyable.

How to Devein Shrimp at Home

The process is easier than it looks.

Remove the shell, leaving the tail on or taking it off depending on your recipe.

Try CMS ToolsFind Recipes2. Make a shallow cut

Using a small, sharp knife, gently make a shallow cut along the back of the shrimp.

You should be able to see the digestive tract

running along

the back.

Lift it out

Use the tip of your knife or a small utensil to gently lift the line and pull it away.

Rinse if necessary

Quickly rinse the shrimp under cold running water if there is any remaining grit, then pat it dry.Is Deveining Always Necessary?

Not necessarily.

Whether you devein shrimp can depend on the size of the shrimp, how it was prepared, and your personal preference.

With very small shrimp, the digestive tract may be difficult

to notice and remove.

With

larger shrimp, however, the dark line is usually much more visible, making removal easier and more worthwhile.

Start Blogging

Identify Plants

Book a Safari

A Small Step That Can Make a Big Difference

Deveining doesn’t require special equipment or advanced cooking skills.

It takes only a few moments, but it can help give your shrimp a cleaner appearance and reduce the chance of encountering grit or an unpleasant flavor.

So the next time you’re preparing shrimp,

take a closer look at that little

dark line.

You may never look at your shrimp the same way again!

How to Clean Dirty Pots and Pans Naturally  Check the first comment.

How to Clean Dirty Pots and Pans Naturally Check the first comment.

by
How to Clean Dirty Pots and Pans Naturally  Check the first comment.

Burnt pots and pans happen to everyone, especially on the underside. The good news is that you don’t need harsh chemicals to clean them. Simple kitchen ingredients like baking soda, salt, and citric acid can make them look almost new again.

Baking Soda – The Classic Solution

Baking soda is mildly abrasive and safe for most cookware.

How to use:

Mix baking soda with a little water to form a thick paste.

Apply it to the burnt areas.

Let it sit for 30–60 minutes (

overnight for heavy buildup).

Scrub with a sponge or brush and rinse well.

✔ Best for stainless steel and everyday cleaning.

Salt – For Light Burn Marks

Salt helps loosen residue without scratching.

How to use:

Sprinkle coarse salt on a damp pot bottom.

Scrub gently with a sponge or cloth.

Rinse thoroughly.

✔ Good for regular

maintenance.Baking Soda + Vinegar – For Stubborn Grease

This combo is very effective on old, greasy buildup.

How to use:

Pour white vinegar onto the burnt&

nbsp;

area.

Sprinkle baking soda over it.

Let it fizz and work for 10–15 minutes.

Scrub and rinse.

✔ Great for tough stains and grease.

Citric Acid (Lemon Salt) – The Most Powerful Option

Citric acid is especially effective for burnt-on residue and mineral buildup.

Method 1: Boiling

Fill the pot with water to cover the dirty area.

Add 1–2 tablespoons of citric acid.

Boil for 10–15 minutes.

Let it cool slightly, then scrub and rinse.

Method 2: Paste

Mix citric acid with a little

water.

Apply to the burnt surface.

Let sit for 20–30 minutes.

Scrub and rinse.

✔ Excellent for stainless steel and heavily burnt pots.

Precautions:

Do not use citric acidon plain aluminum cookware — it can discolor it.

Avoid metal scrubbers on non-stick surfaces.

Never mix citric acid with bleach or chlorine-based cleaners (dangerous).

Test any method on a small area first.

Wear gloves if you have sensitive skin.

With these natural methods, even the dirtiest pots can be cleaned safely and effectively — no harsh chemicals needed.

The Miracle Drink That Flushes Out 15kg of Toxins from Your Gut and Blood Vessels – Time-Tested Formula

The Miracle Drink That Flushes Out 15kg of Toxins from Your Gut and Blood Vessels – Time-Tested Formula

by
The Miracle Drink That Flushes Out 15kg of Toxins from Your Gut and Blood Vessels – Time-Tested Formula

Ingredients:

1 peeled lemon

1 tablespoon baking soda

1 thumb-sized piece of fresh ginger

1 garlic bulb

1 onion

1 liter filtered water

2 tablespoons turmeric powder

1 tablespoon raw honey

Instructions:

In a pot, add water, ginger, garlic, onion, and baking soda.

Bring to a boil. Once boiling, stir in turmeric.

Simmer for 10 minutes.

Remove from heat, cool slightly.

Add lemon juice and honey. Stir well.

How to Use:

Drink 2 tablespoons each morning on an empty stomach.

By Day 3, many report feeling lighter, more energetic,

and

less bloated.

After finishing the batch, take a break for a few days and repeat as needed.

Evening Cleanse Tonic: Detox While You Sleep

While you rest, this gentle tonic works to improve digestion, support elimination, and flush toxins that accumulate throughout the day.

1 tablespoon baking soda

Juice and peel of 1 lemon

½ head of cabbage (chopped)

A small bunch of fresh dill

A pinch of cinnamon

3–4 whole cloves

1 liter water

1 tablespoon raw honey

Instructions:

Add cabbage, dill, cinnamon, and cloves to

a pot with

water.

Stir in lemon juice and lemon peel.

Add baking soda and bring to a boil.

Let simmer for 30 minutes.

Cool, strain, and mix in honey.

How to Use:

Drink 1 cup after dinner, nightly.

Supports overnight cleansing and improved bowel movements.

Deep Dive: Why It Works

Lemon – Flushes toxins, alkalizes the body, and boosts immunity.

Garlic & Onion – Natural antibacterials and liver protectors.

Ginger – Calms the gut, reduces inflammation, eases digestion.

Baking Soda – Balances pH and soothes the digestive tract.

Turmeric – Anti-inflammatory superstar with

liver detox powers.

Cabbage –

Rich in fiber and prebiotics for gut health.

Dill, Cinnamon & Cloves – Antioxidant-rich, antimicrobial, and digestive aids.

Raw Honey – Natural enzyme booster and sweetener with healing properties.

What to Expect When You Detox

Reduced bloating and water retention

More regular, complete bowel movements

Increased energy and mental clarity

Clearer skin and fewer breakouts

Improved digestion and gut health

Balanced internal pH and less inflammation

Your body wants to detox. These ingredients simply give it the tools to do the job naturally.

Important Reminder

While these ingredients are natural and safe

for most, always consult your healthcare provider before starting any detox regimen — especially if you are pregnant, nursing, taking medications, or managing chronic illness.

Final Thoughts

This isn’t a crash diet or magic pill. It’s a return to ancient wisdom — rooted in the healing power of food and herbs. In just one week, this detox drink could transform how you feel from the inside out.

No more guessing. No more chemicals. Just a clean slate — and a clear path to vibrant health.

90 percent get this wrong  Check the first comment.

90 percent get this wrong Check the first comment.

by
90 percent get this wrong  Check the first comment.

Do You Really Need to Remove the Dark Line From Shrimp? Here’s Why It Matters

If you’ve ever prepared shrimp at home, you’ve probably noticed the dark line running along the back.

Some people remove it immediately. Others cook shrimp without giving it a second thought.

But what exactly is that dark line—and should you remove it?

What Is the “Vein”?

Despite commonly being called a vein, the dark line along the back of a shrimp is&

nbsp;

actually its digestive tract.

It can contain digested food as well as tiny amounts of sand or grit.

That doesn’t necessarily mean the shrimp is unsafe to eat if the line is left intact, but it can sometimes affect the eating experience.

Why Do People Remove It?

One of the biggest reasons is texture and taste.

Depending on the shrimp and what it has consumed, the digestive tract can sometimes contain gritty material or contribute an unpleasant, muddy or bitter taste.Removing it gives

the

shrimp a cleaner appearance and can make the final dish more enjoyable.

How to Devein Shrimp at Home

The process is easier than it looks.

Remove the shell, leaving the tail on or taking it off depending on your recipe.

Try CMS ToolsFind Recipes2. Make a shallow cut

Using a small, sharp knife, gently make a shallow cut along the back of the shrimp.

You should be able to see the digestive tract

running along

the back.

Lift it out

Use the tip of your knife or a small utensil to gently lift the line and pull it away.

Rinse if necessary

Quickly rinse the shrimp under cold running water if there is any remaining grit, then pat it dry.Is Deveining Always Necessary?

Not necessarily.

Whether you devein shrimp can depend on the size of the shrimp, how it was prepared, and your personal preference.

With very small shrimp, the digestive tract may be difficult

to notice and remove.

With

larger shrimp, however, the dark line is usually much more visible, making removal easier and more worthwhile.

Start Blogging

Identify Plants

Book a Safari

A Small Step That Can Make a Big Difference

Deveining doesn’t require special equipment or advanced cooking skills.

It takes only a few moments, but it can help give your shrimp a cleaner appearance and reduce the chance of encountering grit or an unpleasant flavor.

So the next time you’re preparing shrimp,

take a closer look at that little

dark line.

You may never look at your shrimp the same way again!

I am 73 years old, I live alone and I feel fulfilled: 4 tips that work for me.

I am 73 years old, I live alone and I feel fulfilled: 4 tips that work for me.

by
I am 73 years old, I live alone and I feel fulfilled: 4 tips that work for me.

I am 73 years old, I live alone and I feel fulfilled: 4 tips that work for me.

I’m 73, Live Alone, and Feel Fulfilled: 4 Tips That Work for Me

Eight years ago, my home grew quiet. My husband was gone. My children had built lives of their own. I braced for loneliness to settle on my chest like a stone. But instead of despair, something unexpected unfolded: a life of quiet richness, gentle rhythm, and deep self‑respect.

Living alone was never my plan. But it became my practice—a

daily choice to tend to my space, my spirit, and my connections. I’ve learned a humble truth: solitude is not isolation. The difference lies not in circumstances, but in small, intentional acts.

What follows isn’t advice—it’s companionship.Things I’ve Learned to Release

Letting disorder take root

A cluttered counter or unwashed dish may seem trivial. But neglect in our space quietly mirrors neglect within. Your home is your sanctuary—the one place you steward with care. Tending it is an act of self‑honor.

Staying indoors too long

At first,solitude feels

like freedom. Then days blur. Voices fade. Stepping outside—even just to buy bread or sit on a bench—is not indulgence. It’s how we stay woven into the world.

Why I Regret Moving Into a Nursing Home: 6 Hard Truths You Should Know!

Say Goodbye to Yellow Teeth, Tartar, and Bad Breath With Only 2 Simple Ingredients

Say Goodbye to Yellow Teeth, Tartar, and Bad Breath With Only 2 Simple Ingredients

by
Say Goodbye to Yellow Teeth, Tartar, and Bad Breath With Only 2 Simple Ingredients

Say Goodbye to Yellow Teeth, Tartar, and Bad Breath With Only 2 Simple Ingredients

Yellow teeth, stubborn tartar, and bad breath are some of the most common oral health complaints today. Coffee, tea, smoking, sugary foods, and even poor brushing habits can slowly stain your teeth and allow plaque to harden into tartar. While professional whitening treatments and dental cleanings work, many people look for natural, low-cost alternatives they can use at home.

The good news? A simple 2-ingredient remedy has gained attention for helping improve tooth appearance and

freshen breath—without harsh chemicals.

Why Teeth Turn Yellow and Tartar Builds Up

Before fixing the problem, it helps to understand it:

Plaque buildup forms when bacteria mix with food particles

If not removed, plaque hardens into tartar (calculus)

Tartar traps stains from coffee, tea, wine, and tobacco

Bacteria release sulfur compounds that cause bad breath

Once tartar forms, brushing alone isn’t enough. However, gentle natural abrasives and antibacterial ingredients can help reduce buildup over time and improve oral hygiene.

The 2 Simple Ingredients

This remedy uses ingredients many people

already have at home:

  1. Baking Soda

Mild abrasive that helps remove surface stains

Neutralizes acids in the mouth

Creates an environment less friendly to bacteria

  1. Coconut Oil

Naturally antibacterial

Helps reduce odor-causing bacteria

Soothes gums and supports oral balance

Together, they form a paste that gently cleans teeth while supporting fresher breath.

How to Make the Natural Teeth-Cleaning Paste

Ingredients:

1 teaspoon baking soda

1 teaspoon coconut oil (soft, not solid)

Instructions:

Mix both ingredients until a smooth paste form

Apply a small amount to your toothbrush

Brush

gently for 2 minutes

Spit out and rinse thoroughly with water

Use 2–3 times per week, not daily.

What Results Can You Expect?

With consistent but moderate

use, many people report:

Brighter-looking teeth (surface stains reduced)

Fresher breath

Less plaque buildup over time

Cleaner feeling along the gum line

This method does not replace professional dental cleanings, especially for hardened tartar below the gum line.

Important Safety Tips

Do not overuse baking soda (too abrasive if used daily)

Brush gently to protect enamel

Avoid if you have sensitive

teeth unless approved by a dentist

Always rinse well after use

For best results, combine this remedy with:

small Dailly habit

Daily flossing

Drinking plenty of water

Limiting sugary drinks and smoking

Natural Support, Not a Miracle Cure

This 2-ingredient method works best as supportive oral care, not an instant fix. Think of it as a way to improve cleanliness, freshness, and appearance between regular dental visits.

Healthy teeth are not just about looks—they support digestion, confidence, and overall health.

Final Thoughts

You don’t always

need expensive products to

improve your smile. With just baking soda and coconut oil, you can take a simple, natural step toward reducing yellow stains, managing tartar buildup, and fighting bad breath—right at home.

Consistency, gentleness, and good habits make all the difference.